After home renovations, start by ventilating the space with open windows and running air purifiers with HEPA filters. Use microfiber cloths for dusting from top to bottom and vacuum thoroughly with a HEPA-filter vacuum, paying close attention to vents, corners, and upholstery. Follow up with damp cleaning to trap residual dust and minimize airborne particles. For a deeper clean, explore more DIY tips to keep your home spotless and allergen-free after renovation work.
Key Takeaways
- Start by vacuuming all surfaces, including floors, upholstery, and vents, using a HEPA-filter vacuum for maximum dust containment.
- Wipe down all surfaces from top to bottom with damp microfiber cloths to trap and remove residual dust particles.
- Use air purifiers with HEPA filters and open windows to improve indoor air quality during and after cleaning.
- Wear dust masks and protective gear to safeguard respiratory health during the cleanup process.
- Regularly repeat vacuuming and wiping to ensure all dust from renovation work is thoroughly eliminated.

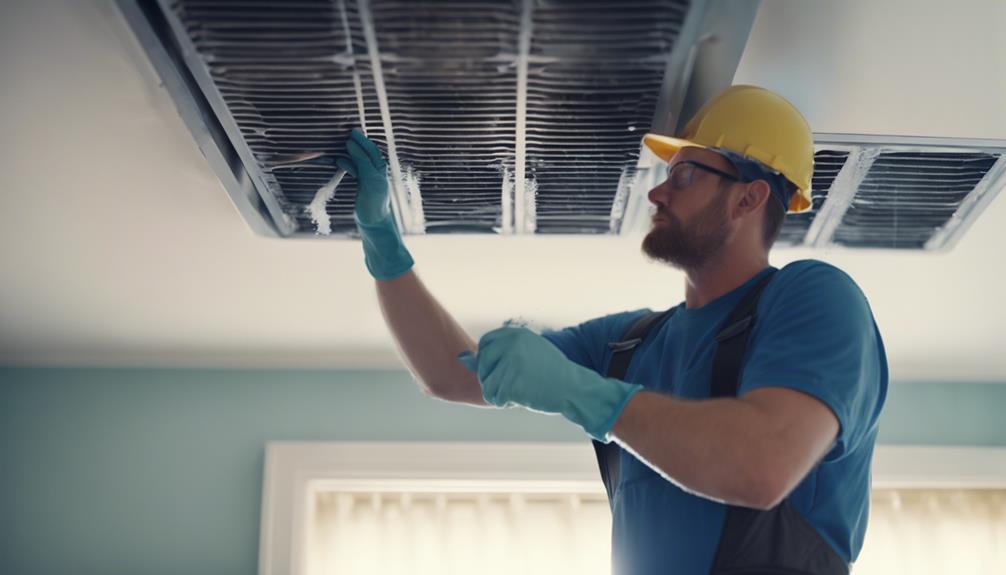
After completing a home renovation, the real work begins: cleaning up the mess. Renovation dust tends to settle everywhere, infiltrating every corner of your home. Tackling this dust effectively is essential not just for cleanliness, but also for your health. Dust removal becomes your top priority, especially since fine particles can linger in the air and settle on surfaces, making your space feel dirty even after sweeping. To start, gather your supplies: microfiber cloths, a vacuum with a HEPA filter, dust masks, and perhaps an air purifier. Microfiber cloths are excellent for trapping dust from surfaces because they don’t just push particles around—they lift them away. When dusting, work from the top down: ceiling fans, light fixtures, shelves, and finally the floors. This method prevents dust from falling onto already cleaned areas, saving you time and effort.
Vacuuming is your next essential step, particularly with a HEPA-filter vacuum, which effectively traps airborne dust particles rather than recirculating them into the air. Pay special attention to corners, vents, and upholstery, which can harbor dust and debris. Don’t forget to vacuum curtains and any fabric-covered furniture, as these tend to trap a lot of particulate matter. After vacuuming, wipe down all surfaces with a damp microfiber cloth to pick up any remaining dust. This step not only cleans surfaces but also helps reduce airborne dust that cleaning with dry cloths might stir up. Using proper cleaning techniques ensures you maximize dust removal and prevent recontamination.
Air purification plays an important role in maintaining a safe and comfortable environment during and after cleanup. Portable air purifiers with HEPA filters can greatly reduce lingering dust and allergens, improving indoor air quality. Position these units in common rooms or areas with high dust accumulation to speed up the purification process. Running an air purifier continuously during cleanup and for a few days afterward helps clear out fine particles that might otherwise settle back onto surfaces. Additionally, opening windows and doors, if weather permits, helps ventilate your space, letting fresh air replace contaminated indoor air and speeding up dust dispersal.

Shark Upright Vacuum, Navigator Lift-Away Deluxe with Large Dust Cup Capacity, HEPA Filter, Swivel Steering, Upholstery Tool & Crevice Tool, Blue, NV360
POWERFUL SUCTION: Deep-clean carpets and tackle bare floors with multi-surface powerful suction.
As an affiliate, we earn on qualifying purchases.
As an affiliate, we earn on qualifying purchases.
Frequently Asked Questions
How Can I Prevent Dust From Spreading During Renovations?
You can prevent dust from spreading during renovations by using containment barriers to isolate the work area and minimize dust migration. Additionally, set up air filtration systems to capture airborne particles, keeping your home cleaner. Make sure to seal vents and doorways, and cover furniture with plastic sheeting. These steps work together to keep dust contained, protecting your living space and making cleanup easier after the renovation is complete.
What Are the Best Tools for Cleaning Renovation Dust?
When tackling renovation dust, you’ll want the right tools to make cleanup easier. Use a vacuum with specialized attachments, like crevice and HEPA filters, to effectively pick up fine dust from floors and surfaces. Microfiber cloths are excellent for trapping dust on furniture and fixtures without dispersing it around. Combining these tools guarantees you remove dust efficiently, leaving your space cleaner and healthier after your renovation project.
How Long Does It Take for Dust to Settle After Renovations?
Like a cloud slowly dispersing in the breeze, airborne dust needs time to settle after renovations. Typically, the settling time varies from a few hours to several days, depending on factors like ventilation and dust quantity. To speed up the process, keep windows open and use fans. Patience is key; rushing might leave residual dust lingering in the air and on surfaces.
Are There Eco-Friendly Methods to Clean Renovation Dust?
You can use eco-friendly methods to clean renovation dust by opting for biodegradable cleaners and natural dust removers. These products effectively trap dust without harming the environment or your indoor air quality. Simply spray biodegradable cleaners on surfaces, wipe with a damp cloth, and use natural dust removers like microfiber cloths or vacuum attachments designed for delicate dust. This approach keeps your home clean while staying eco-conscious.
Can Professional Cleaning Services Remove All Renovation Dust Effectively?
While professional cleaning services excel at removing renovation dust, they don’t always guarantee complete elimination. Think of it like trying to catch every speck of dust with just a broom versus using advanced tools. They often use air filtration systems and HEPA vacuuming, which effectively trap fine particles. So, yes, professionals considerably reduce dust, but some stubborn remnants may still linger, especially in hard-to-reach areas.

LEVOIT Air Purifier for Home Allergens Pet Hair in Bedroom, Covers Up to 1073 ft² by 56W High Torque Motor, AHAM VERIFIDE, 3-in-1 Filter with HEPA Sleep Mode, Remove Dust Smoke Odor, Core300-P, White
WHY CHOOSE AHAM VERIFIDE AIR PURIFIERS: AHAM (Association of Home Appliance Manufacturers) is an ANSI-accredited organization that sets…
As an affiliate, we earn on qualifying purchases.
As an affiliate, we earn on qualifying purchases.
Conclusion
Now that you’ve tackled the dust, think about what’s next. The mess might seem overwhelming, but with these tips, you’re more than ready to handle it. Just remember, every sweep and wipe brings you closer to the stunning space you envisioned. But wait—there’s one final secret to making your cleanup effortless. Curious? Stay tuned—you won’t want to miss what’s coming next in your renovation journey.

USANOOKS Microfiber Cleaning Cloth Grey – 12 Pcs (12.5"x12.5") – High Performance – 1200 Washes, Ultra Absorbent Microfiber Towel Weave Grime & Liquid for Streak-Free Mirror Shine – Car Washing Cloth
10x GRIP-ROOT WEAVE – TRAP MORE, WORK LESS: Ultra-absorbent microfiber towels for car Grip Root weave works like…
As an affiliate, we earn on qualifying purchases.
As an affiliate, we earn on qualifying purchases.

G & F Products Particulate Respirator Dust Mask Two-Strap Cup Style Design, Lightweight with Cushioning Nose Foam, 50 Masks
COMFORTABLE & SECURE FIT: These dust masks feature an adjustable nose strip and a soft, elastic headband, ensuring…
As an affiliate, we earn on qualifying purchases.
As an affiliate, we earn on qualifying purchases.